The water filter works as a physical barrier that removes impurities to make it clean and harmless to consume.
There is a wide range of filters and purifiers available on the market that offer varying levels of filtration.
Depending on what you need the water for, you can choose an appropriate filter to produce filtered water for your exact purpose: swimming pools, aquariums, irrigation, or drinking.
An important thing to bear in mind is that some minerals are good for our health such as magnesium and calcium. But, among the impurities or contamination, the water may have traces of bacteria, viruses, chlorine, pesticides, or industrial effluents.
It can be filtered to remove these harmful contaminants.
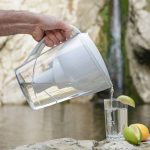
The most common variety of water filters is the one that we use in the kitchen.
This kind of filter has to produce water clean enough to be used for cooking or drinking.
For this kind of water filter, the standards are set by the governments, or the international standards are followed.
However, before we go about making our own kitchen water filters, some clarity is required as to what impurities are present and what needs to be removed.
The first thing that needs to be understood is that a common water filter can remove sand and dust particles as well as bacteria and protozoa, but not viruses.
A water purifier, however, can remove all these 3 types of microbes.
The water that we get from natural sources is never pure or entirely clean.
We get clean water after running it through a filtration process that removes unwanted minerals and contamination.
So, let’s get down to business:
How to Make a Water Filter
Here, I’m going to describe some of the most common kitchen water filters that we can make all by ourselves and the great thing about them is that they do a great job as a filter and clean the water to make it safe for drinking and cooking.
3-Bucket Bio Filter
This is one of the most popular Do It Yourself (DIY) filters.
It consists of 3 separate layers of filtration in a single set-up.
Among the 3 layers, the first from the top is made with gravel, the second with sand, and the final one with activated charcoal.
This helps clean big, medium, and small particles present in the water.
You will need some very basic materials to make it. Here they are:
- 4 food-grade 7-gallon buckets
- Activated charcoal
- Gravel
- Sand
- Screen
- Hole saw, a knife, or something similar to make holes in the buckets
Let’s start by turning the buckets upside down and cutting a hole in the bottom.
Now, fill the first bucket with gravel – small pieces of stones and pebbles. This will remove big particles of wood and dust and also insects.
Fill the next bucket with sand to filter out smaller particles that may have passed through the first layer of the filter.
Finally, the third bucket should be filled with activated charcoal. It will remove pathogens as well as chemicals that may be present in the water.
After coming through the 3 layers of filtration, the water will become pure and clean – good enough for drinking.
Now you can set up the 3 buckets in a manner that the water that needs to be cleaned is poured into the bucket filled with gravel.
After filtration, the water should drip from the bottom hole you have just made into the second bucket filled with sand.
The water drips further into the bucket with the charcoal. When it drips from the bottom hole, it is clean and pure.
Your first kitchen filter is ready for use.
However, you can add more layers of filtration or can even design it differently to suit your needs as long as you don’t violate the 3 layers of filtration.
Distiller On The Stovetop
You’ll need:
- Feed-through fitting
- Tea kettle
- Stove
- Glass jug
- Hose
- Detergent
- Tap water
Before you assemble these loose pieces into your homemade water distiller, you should clean each one of them thoroughly with detergent and warm water.
Now, let’s start by inserting the feed-through fitting.
Once it is ready to work, allow the steam to escape from the feed-through fittings for about 6 minutes.
Now, a clean hose (able to withstand high temperature) should be attached to the feed-through fitting. Allow more steam to pass so that the entire set-up gets thoroughly disinfected.
Finally, place the free end of the hose into a jug to clean pure water.
The clean water in the jug is the result of the condensation that takes place after the contaminated water is heated in the metal pot.
You can store the pure water in food-grade plastic bottles.
Solar Water Disinfection
Using solar power to get clean water can be a good idea.
For this, you need to work with Solar Water Disinfection (SODIS).
To use this system, you will need a location that has ample sun and a container to store clean water.
The only drawback with this system can be that it may take a little longer to filter the water depending on its source.
Now, place the water in direct sunlight.
Place a thin screen so that contaminants from outside do not get into it.
If the water is looking bright and clean, it should take about 2 hours for it to get disinfected in the direct sunlight.
But if it looks unclean or cloudy, let it remain exposed to sunlight for 2 consecutive days.
However, it is important to bear in mind that in this way you may not get completely pure and clean water.
It would be better if you use at least 2 methods of filtration for your kitchen water.
If you are using only 1 method of filtration, it is recommended that you boil the water before drinking.
Summary
The importance of clean water cannot be over-emphasized; we know it already.
If you don’t have a water purifier or water filter, you can make one with the methods described above.
📌 Pin Me for Later Reading! 📌
Which method is the most suitable for you, based on the quality of your local drinking water?

Be the first to comment